Total Pageviews

Search This Blog

Sunday, December 26, 2010

Charley's Yurt design

Charley, an old friend of mine started with mason bees a few years back.  He loves the challenge of wood and design.  We often talked about the yurt.  At one point he asked me "What do you need,  how long  and high must this be..?".  He said  "Ï'll have a go".  Some time later he came back with his yurt in the back of his red pickup truck.  He said, "I do wood work, but I don't know anything about sewing".

The structure was complete, but it needed a tarp.  So, I bought some tarp material and set to work.  Draping the tarp around the uprights was easy.  A few staples held it in place.  It took me a bit more work to do the roof.design.  The tricky part with the roof is that you cannot have any folds, because the bees might get caught in amongst the material.  I ended up stapling the material to the roof after sewing the pieces together.

Charley's yurt design.  We painted a black bee design on it - just for the fun of it.


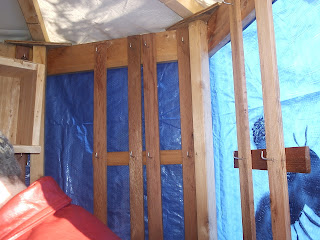
Inside of Charley's designed yurt.   A piece of plywood over the uprights held the base of the roof pieces.  The upper parts of the roof pieces were attached to the roof hexagon.


The corner uprights were made from 1.5 x 1.5 inches.  Two pieces of thin lath was used to hold one Highrise with nesting trays.  Each Highrise was hung onto the lath with two hooks.


Every piece of thin lath was nailed to the main structure that consisted of 2 hexagons (upper and lower -made from 1X2's).  A piece of welded re-bar was attached to each upright, at the base, so that the re bar could be pressed into the ground for added stability.


Tim standing next to Charley's finished yurt.


Three rows of Highrises fit into this size yurt.  Each Highrise is filled with our Quicklock Eco-Corn trays


Soil is added to the extra length of tarp to prevent wind from going underneath the tarp.

This yurt worked great:  Mason bees did not get caught in any part of the structure, during the day the temperature was always warmer inside ( but never over 30 Celsius).  It is definitely sturdy.  I did try it out in Cawston BC, and I was told that it may get very windy on some days.  To make sure the yurt did not topple , I tied 3 guy ropes to eye hooks and to a fence.  More recently I have simplified this by setting the yurt adjacent to a sturdy post and tying a rope around the yurt and fastening the rope to the post.  This works well.

However, this design is a little complex- we are mainly speaking about the complexity of the roof design.  Also, not everyone has a  welder so that pieces of re bar can be fastened to each of the six 'feet' of the yurt.

We need a design that is simple to assemble and set out in a garden.

Over the next week or I want to tell you about our other yurts, their advantages and disadvantages.  I want to show you our yurts made of re-bar and made of irrigation pipe.

I also have a collection of photos of what people have found in  their mason bee nests.  Fascinating!...More next time.


Saturday, December 25, 2010

More double decker nests in large fields

Every year more cocoons were produced and so we build more nests.  

In this particular year stacked boxes are sitting on top of large fruit totes.  I did this so bees could freely fly in and out of their nest.  The problem was that the wind also caught the nests.  It was not surprising to see that the lower nests shielded from the wind by the blueberry bushes were filled first.

Friday, December 24, 2010

Stacking nests in agricultural fields

Here are another couple of stacked large box-like structures to protect mason bee houses during the pollination season,


Stacked box Sysem for pollinating field crops

The small boxes with holes at the front are 'emergence boxes'' for releasing bees  (contain 100-200 mason bee cocoons).  In this setup, there are 8 on the left hand side of the upper shelf and 3 on the upper shelf on the right hand side. I ran out of emergence boxes, and had to use an old bird nest (upper LHS).   

One problem with this structure is that it catches the wind and it makes it more difficult for bees to fly in and out of the nest. The wind also makes it colder around the nests.


These stacked boxes were set on top of  blue bins since we ran out of wooden pallets.

Note the electric fence used to prevent bear damage.  For increased stability, 3 posts were hammered into the ground and nailed to the boxes.  

Looking back to these structures, the yurt is a dream to use.  In the next few blogs, I will be writing about our yurt designed by Charley Ford.  The uprights are no problem , but the roof design is  a bit tricky.

Thursday, December 23, 2010

Releasing and storing large numbers of cocoons

Before we used corn nesting trays inside yurts, we used wooden nesting trays in wooden structures (picture below).  Here, we are dealing with thousands of cocoons.  How to release them is a good question.

With alfalfa leaf cutter bees, cocoons are set out in open trays (see previous blog), bees emerge and then fly to nearby nests.  I have tried this method, but gusts of winds or something upsets the trays and all cocoons end up on the ground.

The system I normally use for setting out cocoons is to place them into small wooden shelters as seen in this photograph.  On the upper shelf in this picture there are 3 shelters on the left hand side and 3 shelters on the right hand side.  Each shelter contains between 100- 250 cocoons.  The little door on the front of each shelter has a hole from which mason bees emerge.  I find this shelter system the most secure way of releasing cocoons, no matter how many cocoons I have.


Open structure for mason bee houses.

Nesting trays are usually set up in Highrises (see www.beediverse.com).  Highrises hold about 10-12 nesting trays.  We do not normally use the cedar roof on the Highrise in this system.  I find the Highrise the best system for setting out trays.  It easily fits a variety of trays and protects the nesting trays from the weather.


Wednesday, December 22, 2010

A perfect location for mason bee houses

This old cedar shake cottage, which was probably a livable house at one time, is the perfect place to hang a few nests for mason bees. There are lots of reasons why this might be a great place to produce mason bees.  The house itself, provides a place out of the rain with its overhanging roof, the cedar shakes on the sides of the building probably have mason bees amongst the shakes already, it is a warm location, protected from winds by some huge trees, and it is in the sun.  

Cedar shake cottage - and ideal location for mason bees


Not only is it a warm location in direct sunlight, but the warmth of the shed wall would stay warm long after the sun had gone down.  This is important in keeping bee larvae active and feeding.

In addition,the owner, has lots of fruit trees and blueberry bushes adjacent to the house providing abundant food sources for the bees.  And, most importantly, no pesticides are used on the property.
 
You can imagine my surprise when I produced fewer cocoons in the first season than the number of cocoons I set out.  The 3rd and 4th years were no different.  The fifth year the bee population exploded.


A collection of mason bee nests on the south facing side of
a cedar shake cottage.  Odd shapes, colours and layout of nests
helps the bee in finding its own nesting tunnel.
I initially thought some freaky weather pattern made the area cooler and not very attractive to bees.  But the 5th year's explosive growth  countered that argument.  If production continues to be good, than food and other weather related conditions must be ok for mason bees. 

My theory now is that during the first few years, there were so many available nesting holes in amongst the cedar shakes and the density of bees so low, only a few nested in the mason bee houses that I had set out.  As the years passed, the cedar shake nesting holes filled up and mason bees began to use the mason bee houses in earnest.

If this is true, then natural nesting holes will be used first since these are more attractive then most man-made nests.  After a few years mason bees will start using mason bee houses. 

Note:  All man-made nests and cocoons were cleaned every fall.  Wooden structures were cleaned and scrubbed.  Cocoons were washed free of mites, and later candled to identify and destroy any parasitized  cocoons.

Tuesday, December 21, 2010

Our very first yurt

Our very first yurt was made out of wood lath, 6 sided and covered in tarp.   The tarp was stapled to the wooden frame.  The yurt was set onto a wooden pallet to get it above the wet ground. We checked the inside temperatures by setting up thermometers and recording temperatures over several weeks.  Temperatures were higher than outside temperatures and bees did not get caught in the tarp.  We used it for a season, and it worked well.  But of course lathe is not strong enough for long time use.  We also needed a sturdier structure to hold all the nests.  We also needed a simpler roof design. 


Monday, December 20, 2010

20 Dec 2010 Crab apples, small and large

After a dinner at a community hall one year, I wandered through the surrounding garden and I was delighted to see this crab apple tree with all its fruit.  Since it was fall and all the leaves had fallen, these pink crab apples, small and large, made a showy and colourful picture.  Because I studied pollination and pollen loading of blueberries, I was off course interested to having a second look at the pollination of this tree.  I wanted to see if there were any patterns of where the large and small apples were located on the tree.  One pattern was very clear and can be seen in this photo.  The more accessible flowers on the outside of the canopy produced larger fruit.  This means that flowers on the outer canopy received more bee visits because more pollen was deposited on these flowers.   The lesser accessible flowers on the inside of the canopy are small and received fewer bee visits. Flowers close to the ground also produced small fruit. 

This tree did not receive optimal pollination.  If the plant is healthy, the two major reasons why poor pollination occurs is insufficient bees or poor weather or a combination of these two factors. If poor pollination occurs in good weather, then insufficient bees is the more likely reason for poor pollination. 

People often ask me how many mason bees must a garden have for good pollination.  Fruit production is a great way to tell if good pollination occurred during the previous spring.  If pollination is good for a series of 3-4 years, which includes a poor weather year, then sufficient bees are in the orchard.


Lack of good pollination produced both large and small crab apples.


Saturday, December 18, 2010

Problems with bees finding their own nesting tunnel.

After our trip through Saskatchewan, the idea of a workable yurt for mason bees began.  I was fascinated by the roof opening and how it apeared to work nicely with alfalfa leaf cutter bees.  Since leafcutter bees and mason bees are in the same family a yurt like structure might just work   for mason bees.

 I had one experience with leafcutter bees that did not work very well at all.  But I did learn from the experience.

 I built a  U-shaped structure using regular poly on the surrounds.  The roof was made of solid wood.    The open part of the ''Ú' acted as an open door.  Bees emerged and started nesting.  After a couple of days, I was back and to my dismay, the leaf cutter bees were getting caught between two layers of plastic stapled to the wooden uprights.  The stapling kept the plastic on the structure, but if a bee became disoriented, she would fly agains the poly and then over time end up between the overlaid plastic walls.  Many were caught.  I removed a lot of them by cutting the plastic, but this let the wind in and ....basically this structure did not work at all.

The yurt cover is made from one piece sewn together to form a snug fit.  If a bee does get disoriented in a yurt, she ends up flying out through the roof, and back into the yurt via the door.  A great solution for disoriented bees.

Friday, December 17, 2010

Prairie yurts part 2

Yurts of all colours in the distance.
 These prairie yurts make pollination feasible since leafcutter bee nests are protected from the wind and rain.  Temperatures inside the yurt are warm under windy conditions and on very hot days, excess heat escapes through the roof.  It seemed that this structure moderated both cool and hot temperatures.

We saw two designs  that consisted of a metal framework and surrounds of tarp.

The metal framework consisted of  one inch square tubing, welded together into a Octagon.


In this yurt, the roof consisted of 8 metal bars, bent to make a sloping roof.  Note that the tubes leave an 8" diameter hole in the roof.

I found out later, that these very heavy structures were left in the field all year round.  Of course the tarp was removed when nests were removed.  Sometimes fields of alfalfa are burned with the metal part of the yurt still in the field.  Because of their weight, you would need a good size truck and some kind of a lift to haul them onto the truck.

I thought this would be a good system for farmers who have heavy duty equipment, welding capabilities and large acreages to pollinate.

But a structure is needed so that small operators with a few thousand mason bees or more can be more successful in gardens and small orchards.

The tarp was held onto the frame with plastic ties threaded through tarp grommets.

Most of the leafcutter bees flew through the door opening, but a few, perhaps the disoriented bees, exited through the roof.

Even with a stiff breeze, it was nice and warm inside the yurt.  Not too hot, like the plastic molded yurt.

Since that time, we have tried quite a few different designs using different materials.  We do know that we are sticking to tarp material.  Tarps work and are readily available.  More on some of our designs in the next blog.


The framework of this yurt consists of 8 pieces of metal.  These are welded together using a center ring.  There are 3 alfalfa leaf cutter bees visible flying through the roof -vent hole.


A plastic tie used to hold tarp to metal framework of the yurt adjacent to door.


This is a view through the front opening of the yurt showing styrofoam nests hung from the framework, and against the walls of the yurt.  The wooden box just visible below the doorway horizontal bar, contained leafcutter bee cocoons.  Most had emerged when we looked.
 

Thursday, December 16, 2010

Bees in the prairies

The first time I saw yurts was in 2005. 
Strange structures in a prairie alfalfa field
In 2005, we travelled across Canada for a holiday. While we were travelling through Saskatchewan, I saw these strange structures in alfalfa fields.  I guessed that these structures could be housing alfalfa leaf cutter bees used to pollinate alfalfa for seed production.  A few years prior to this, I had seen wooden sheds, crates and empty buses used to house alfalf leaf cutter bee nests.  We looked inside and saw that it did house leaf cutter bee nests.  However, even though there were quite a few small vent holes and an open door, it was very hot inside.  This yurt was molded and made of plastic.


Molded yurt for housing alfalfa leaf cutting bees

Inside this molded yurt, styrofoam nests were hung from the walls with baling wire.  One sheet of styrofoam nests was strapped to another.  In another yurt styrofoam nests were hung from the walls.  The patterns drawn on the nest are orientation cues for returning bees.


Styrofoam alfalfa leaf cutter bee nests hung from the walls of the molded yurt
 
A emergence tray of loose alfalfa leaf cutter bee cocoons.
 Colourful yurts made of tarp material were also seen.  The roof was made out of translucent white tarp and the wall was either made of white, orange or blue tarp.

Yurts made of tarps in the distance.
 
Tim is having a closer look at a tarp yurt in a blooming alfalfa field.
  

 When we stepped inside, the temperature was probably around 25C.  Not too hot and just right for alfalfa leaf cutter bees.  Alfalfa leaf cutter bees need at least 20C.  I thought that this yurt design was much better than the molded yurt.  The temperature inside the yurt was just right for these bees. The only difference that I could see between the tarp yurt and the molded plastic yurt was the larger roof hole in the tarp yurt.

...More on this design next time.


Wednesday, December 15, 2010

Food plants for bees

Thank you for your feedback, comments, great ideas and questions.  If you have any pictures and or stories about mason bees to pass along to other readers, email them to me and I will post them.


This white Rhododendron provides valuable pollen and nectar supplies for mason bees.  Unfortunately not all rhododendrons provide food for bees.  


One of the bloggers-Steve suggested using a large (garbage pail size) plastic container  for holding nests.  I tried this type of structure when I was using nesting straws.  The container was set up on a framework above the ground and on its side.  We cut a few holes for venting water vapour through the roof (base of container).  We also cut a few holes into the plastic at the entrance because bees would get caught in the puddles in the rim and drown.  Nest would first be completed and filled in the upper sections (where it would the warmest) and slowly the lower nesting tubes would be completed.  The system worked for a couple of seasons until we moved onto nesting trays.  Square blocks are more difficult to arrange into a round structure and we needed larger structures to hold many nests.  Sorry Steve.  I dug around for a few photos, but I think they were pre-digital.  I will dig them out at some future date.

Tuesday, December 14, 2010

Yurt

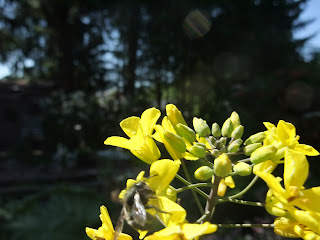
A mason bee on a cabbage flower.
  Our first yurts were made out of wood. and the nests were set up inside the yurt.

These are two yurts, 6' and 8' in diameter.  Dick Scarth and John McDonald discussing the merits of yurts.  Nesting trays were set up inside the yurt, stacked on top of wooden boxes.    Even on a cloudy day as when this picture was taken, it was nice and warm inside the yurt.  The cover was made of tarp material.  Note at the base of the wall, the tarp is covered with saw dust to prevent wind from entering underneath the wall of the yurt.  Also note the elcetric fence to prevent bear predation.


Quicklock trays set side by side on wooden boxes inside the yurt


In the early 1990's...


In the early 1990's at the beginning of my research on mason bees,  I read numerous papers on mason bees.  Many of them were authored by Phil Torchio and published in the1970's.  What I could not work out immediately, at the time, was why after all this research, were mason bees not available by the billions for pollination crops and home gardens.  There must be something I am missing.  In about 4 years I had over 20,000 cocoons and set them out in blueberry fields.


Since there are is no protection from the weather in blueberry fields, these open sided boxes were set out with about 20,000 mason bees.  Each structure contains about 600 nesting tunnels in highrises or stacks of 72 nesting holes.  The nests are oriented in slightly different directions to assist the returning bees finding their homes.  The coloured plastic was placed in the ground and used as protection against the rain and also used as orientation cues.  The wooden structures were set up on totes to get above the splash zone.


Bees will forage and pollinate any flower that has food for them.  Plants that produce lots of nectar and pollen are preferred over others.  This is a cabbage flower.

If my increase in mason bees over four years is a normal increase in numbers, I should have bees by the billions.  I don't.

We know that if parasitism and predation gets away from you, numbers of cocoons produced can drop dramatically.

But there are other factors.

Food availability is a non- brainer.  But it is difficult to assess if the quantity and quality is out there for our mason bees.  Seeing flowers is one thing, but knowing the quality of the pollen is another.  We usually assume lots of flowers means lots of food.

All these factors are important, but nothing works if the weather does not cooperate.

So making a structure that keeps the bees warm and out of the rain and wind, makes a lot of sense.  It is not only important to keep the nest warm for the adults, but for the developing young as well.

The open wooden structures (as in picture above) were unwieldy and protection from the weather was minimal altough sufficient if the weather was sunny!

The Gazebo for mason bees was born.  More next time.