Total Pageviews

Search This Blog

Wednesday, February 29, 2012

Variety of nests. Advantages & Disadvantages


My friend from Duncan sent me photos of all her different nest types.  No matter what kind of nests you design or use, most nests are used by bees.  They will prefer some over others, but if there are lots of bees, and nesting space is limited, mason bees will use any type of nesting cavity.  But the type of nest takes on a different meaning when considering that keeping mason bees and keeping them pest free is of a very high priority. The ease of getting into the nest, harvesting and cleaning cocoons become a very high priority because it determines in part the success of mason bees.

Cleaning station in the kitchen.

These are hexagon shaped nestign tunnels made of clear plastic. 
There is no doubt that mason bees use it, but cleaning nests and
harvesting cocoons is not possible with this nest type.  In most locations
if nests are not kept clean, parasites and mites build up in
 such numbers that the bee population collapses in 3-4 years.
This structure holds the clear plastic hexagons, paper
tubes and reeds.  Paper tubes can be opened and cocoons can be harvested.
Reeds can also be opened with relative ease.  Take care
when choosing reed type because some types of bamboo are near to impossible to open.
This is the Beediverse Highrise with tubes on the side. 
The Highrise Quicklock nesting trays can be opened and
cleaned.  After cleaning these nesting trays can be re-assembled
 for the following spring.
A great spot for mason bee  homes-a warm
south facing wall under an overhang.
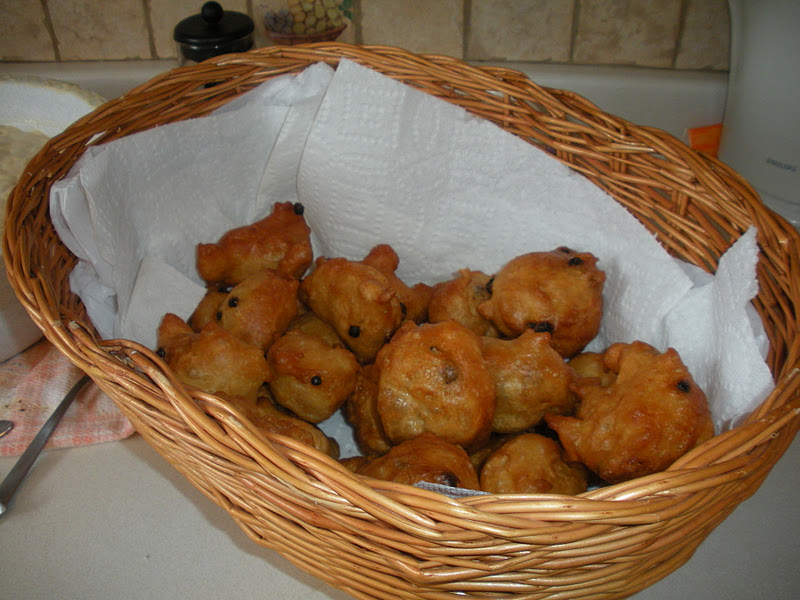
Success!  Cleaned and harvested cocoons

Saturday, February 25, 2012

from Holland- Osmia rufa and Roeland's new nest design

Roeland also sent me some photos of his new nest design (with permission).


John's Mason Bee Field Shelter and materials required

Here are John's photos of his very economical set up for mason bees.  It protects bees from chilling spring winds, and provides extra warmth to mason bee nests.  The full length tarp that goes to the ground keeps the wind out.  To keep all the wind out from entering the base of the structure, cover bottom of  tarp with mulch or some soil.

Advantages over the Beediverse Yurt is that with John's field shelter you don't have to deal with fitting a tarp over a hexagon roof with a hole it it.  It is not easy.  The field shelter's roof is simply a piece of plywood.  John's mason bee field shelter is very economical. 
Both the yurt and John's field shelter release excess heat.  The yurt has an 8" diameter hole in the center of the roof which lets out excess heat, but keeps it nice an cozy for the bees.  The gap between the tarp and roof releases excess heat from John's shelter.  Shortly, I will be placing the yurt onto our web site for gardeners who would like to try the Beediverse yurt.


Here is John's list of Materials  and instructions:
   1-9x12 tarp - blue
   6 - lath strips or equivalent
   1-42x72x1/2 or better plywood for back side
   1-42x48x3/8 plywood, primed one side for roof
   4-2x2 or 2x3 x96 posts- for vertical support
   4 or 6 ell brackets for shelf support
  
   Drive posts into earth at 42 inch intervals, attach back plate on north side, then roof with overhang. Provide bracing with lath at 45 degree angle for wind. Keep front posts 6 inches higher than back to run rain.
   Wrap with tarp leaving 6 inch opening at the front[south]. Use 1 1/2 in. screws at grommet holes for ease of attachment and removal. Attach ell brackets for shelf support as required.
   Now your bees will much warmer and so much busier.


John starts off with setting 4 sturdy posts into the ground. 
Then secures a 1/4 " sheet of slightly slanting plywood onto the 4 posts. 
Between 2 posts, he attaches - with screws a 1/2 sheet of plywood. 
He attaches shelving to the plywood and the two posts. 
Nests are set onto shelves.
Here is a closer look at the shelving. 
On the right hand side are routered wooden nests. 
On the left are boxes with angled 1" wide slats with
Quicklock trays inside the box.
Blue shelter complete. 
Once nests are in place with bees are set out in emerging boxes,
tarp is wrapped around all 4 sides- leaving a gap of at least 8"
between roof (1/4 sheet of plywood) and the top of the tarp. 
Note wood slats are stapled over tarp  and onto posts to keep them place.
  
This is the second version with a  cross piece
that helps stabilize the structure.


Thursday, February 23, 2012

"I love mason bee" T-shirts

This great T-shirts is made from 100% cotton and is now availabe on the Beediverse web site.

Let others know how you feel!! 

These T-shirts are on as a special.  From $19.99 to $15.99.  Save 20%

See this product on the Beediverse web site

Sunday, February 19, 2012

from Holland- Osmia rufa

  
Roeland Segers from Holland contacted me the other day about nesting alternatives.  We continued our conversation about Osmia rufa, an European Mason bee.  I asked if he would like to share some of his photos with the blog and its readers.  I was most delighted to receive the following photos.  If you'd like to contact him direct, go to his web site.  The website is in Dutch with some gorgeous photos.  He writes
 My company has recently been rebranded to: De Bijen, Bestuivingstechniek (translating to: The Bees, Pollination techniques) from Nijmegen in the Netherlands. My websites: for masonbees http://www.metselbijen.nl/ (for honeybees http://www.rendementdoorbijen.nl/ )"
Roeland's mason bee web site

Mason bee se-up while pollinating cherries.
Mason bee nests are made of routered channels cut out of compost board.
Boards are held together with a tie-strap.  

Osmia rufa doing the finishing touches to her nest.

Osmia rufa male.  Note the long antennae.

Females resting over night inside their nesting tunnels.
Embrace (Osmia rufa)
Fierce competition

Saturday, February 18, 2012

John's Mason Bee Field Shelter

I also chatted with John from Delta.  He has been doing mason bees for quite a few years now and he is a true experimenter.  Every year he comes up with ideas that he tries out.  On my visit this time, he told me that for the first time last year he was able to beat the wind.  He has a very cold wind coming off the sea in the early spring.  He had seen the various yurt design and found them too complex. I saw his design, and I think it is a good one.  It is simple and anyone can set it up.  Last year it worked well.  It works similarly like a yurt, but you do not have a hole in the hexagonal roof.  More on this subject when John sends me his pictures and a story.
Aan update- we could not figure out what to call this structure at first.  A Mason Bee Field Shelter describes it nicely.

If any one has  story to share, send me pictures and a story about bees and pollination-  Thanks.  I think a lot of people will enjoy reading it.  On average, 70 pages are read on this blog every day.  Quite amazing.

Candling cocoons

A comment on this blog asked for more pictures on candling cocoons. 

Just today I candled 4000 cocoons.  It seems like an awful lot, but when they are in  petri dishes it is easy to do candle them- about 30 mins or so.  I did see some duds that are of some interest.  I call anything that is not a fully developed bee a 'dud'.  The percent 'duds' in this batch was 2.5%.  Anything under 5% is excellent.  But even with 107 duds there are some interesting ones.  Few had fully developed parasitic wasps- ready to emerge in spring.  Others were bee larvae that had not completed development into an adult. In the next day or so I will take some photos and put them on this blog.

I was teaching a group of people about candling the other day.  It is a straight forward procedure but the conditions have to be right.  The room that you do the candling in has to be completely dark- a bathroom without a window for example.  Any extra light besides the flashlight is too much light and you cannot candle the cocoons.

Friday, February 10, 2012

Mason Bees for Sale- Seattle Garden Show this week!

Mason bee cocoons are also available at the Beez Neez booth.  Cocoons are neatly packaged into a small cardboard box. It is easy to set out the cocoons.  Open one end of the box, set inside the housing and let nature do its thing.  All our cocoons are washed to remove mites and candled to remove any parasitic wasps.   Hope you having a grand time at the show!

Seattle Flower and Garden Show -Feb 8-12 2012

Beediverse Products are at the show!  We are at Booth 2352. Jim Tunnell owner of Beez Neez has all our products!  Come and say hello.  You will recognize them with our new T-shirts! I love mason bees!    All products shown below are available at this years show- including cardboard nesting tubes, and Quicklock nesting trays.  Have a great time at the show.

You will recognize Jim's staff
with this great T-shirt.


The beautiful Royal Bee home
Viewing box for seeing bees at work!
Our largest mason bee home 'Highrise'

Chalet with predator guard

Natural Nesting Reeds-

Friday, February 3, 2012

Methods of Cleaning cocoons- sand or water

Frank M. wrote
"This year I switched to the "dry sand" method of cleaning as developed by Gord Hutchings, to test it.  The group seemed to like it, mainly because there was no waiting time for the cocoons to dry.  I added a step that Gordon does not do -- after thorough scouring with sand, we put the cocoons into a large flat-bottomed stainless steel screen and gently agitated it over a vacuum cleaner hose nozzle.  This helped to remove additional mites, frass and bits of mud still adhering to the cocoons.  The one thing I don't like about the dry method is that although it seems to do a pretty good job of removing mites, it does little to remove the frass, so the cocoons don't look "clean".  But I reason that the frass doesn't matter to the emerging bees, whereas the mites matter a great deal.  Do you agree?"
I think it is wonderful that people are experimenting with ideas developed to manage mason bees better.  Here are my thoughts.
Cleaning cocoons and the method you use is a personal choice and it depends on what outcome you want.  I still use the cold water method with an optional bleach wash.  Although there is a 1-2 hour drying time needed to completely dry cocoons I still prefer the water washing method for two reasons.

Washing with water, removes all frass and most mites.  The removal of frass is an important part of the cleaning process because it allows cocoons to be candled.  Successful candling can only be done with clean cocoons.  I want to make sure that cocoons parasitized with little wasps don't end up in the cocoons that I sell or place out for production.   
The other reason why frass should be removed, and the water method of washing does it well, is that the presence of frass makes it more difficult to remove any adhering mites.  After washing cocoons and then drying them, most of the remaining mites are removed by gently rolling cocoons over a metal screen. Frass would impede this process.

Thursday, February 2, 2012

Inside the nest- healthy cocoons and mites

Here is Frank's third photo. 
"015 shows channels with healthy cocoons, but I've never seen so much bee frass!!  The only part of the cocoons visible in the image is where the cocoon surfaces were tight against the base of the overlying tray. Othewise all the free space around the cocoons is packed with frass.  Have you ever seen the likes of it?"
The Dutch would describe the frass to look like a sandwich spread called Chocolate Hail!  Not as yummy though.
I have on occasion seen frass in these quantities.  I think it means that these bee larvae were well fed and then produced lots of frass or bee feces.  These healthy bees will have the energy to eat their way out of their cocoon and start a successful nest.
Another interesting item  in this photos is those tiny pale blond spots all over the wood and over the cocoons.  These are the pollen feeding mites.  If these mites are not removed, mites wait for the bee to open the cocoon, the mite sneaks in and attaches itself to the bee- to set up house in the next nest.

Tuesday, January 31, 2012

Inside the nest-pupae and wiry frass

Here is Frank's photo number 017 
"It shows a wooden tray infested with foreign larvae, plus at least four different-looking types of wiry frass.  Are they all from the same insect and  reflect differences in diet, or might they actually represent different organisms?"
The upper channel possibly contains the pupae of the houdini fly.  The lower channel has 3 chambers with wiry frass that probably belongs to the spider beetle.
Lovely photos Frank.  Sorry we could not be more clear on the ID of these insects.  Let me know if you have placed them in a petri dish to develop into full adult.

Inside the nest- many white pupae

Here is photo 011 by Frank M. 
Frank writes "011 shows just how abundant these foreign larvae were in some cases.  In this image, they are actually spilling out of the channels because the upper part of the channel was filled too. Notice also that at the right-hand side of the image there is a chamber filled with wiry frass that is different from the stuff in image 004."

These grubs, may well be the 'fruit fly' Joe S. took and I wrote about on Jan 7th 2011 in this blog.  Joe mentioned these fruit flies had red eyes.  A friend of Joe's searched the web and came up with "houdini fly"  Cacoxenup-inbagator flies.

If you still have these grubs, set them up in a moist warm environment such as a petri dish and see what comes out.  What an interesting project for a child who is interested in science.  The search continues.

Monday, January 30, 2012

Inside the nest- wiry frass

Frank M.  contacted me recently about his findings at his yearly mason bee workshop.  A most interesting series of photos- with permission.
"This photo shows some extraordinary wiry frass, even more wiry than the material that I showed you last year from the 2010 harvest.  Any ideas?  There is also some fluffy stuff in the same chamber and the one next to it, similar to the material in one of the images on one of your blogs."
This beautifully constructed chamber inside a routered piece of wood, has concave mud walls.  It normally contains one masn bee cocoon, but something has entered it.  The chamber contains frass- or insect fecal material.  According to Bosch and Kemp (2009)  wiry frass is likely produced by one of two insects found in masn bee nesting tunnels.  One is the cuckoo bee.  If there is a cocoon amongst the mass of frass- then it would be the cuckoo bee.  If there is no cocoon- it is most likely the spider beetle.  It is about 2-3mm long with 4 white patches on its back and long attennae.  Both insects eat and destroy the mason bee larvae and its food.  They both invade the chamber when it is pretty close to being sealed by the bee.

Sunday, January 29, 2012

Ground nesting Bees in a school yard

Ground nesting bees usually emerge in June when soil temperatures increase from the cooler spring temperatures.  These bees are often more than a foot down in the ground.  Usually one bee uses one entrance, but in some species a few bees use the same entrance, but different nesting tunnels.

This aggregation is in a school yard ( Burnaby, BC).  When Alie told me about it, she showed me the area adjacent to a small fence.  the kids came out for a show and tell, and they were fascinated.  Anyone know the type of bee?

The soil is quite hard in this area and when the sun shines, the ground is always in the sun.  if you look closely, you can see little mounds of earth deposited by the emerging bees.  The scale becomes a little clearer when you see the children's feet in the area.  When all the children were back in their class, I checked out to see the scope of the area.  It was quite large  (10 x 10 m or 30 x 30 feet). 

Thursday, January 26, 2012

Snowy Owls- Coastal BC

We have had some awesome visitors on the West coast of BC and in WA.  My friend Gary sent along these pictures and the photographer gave me his permission to place them on this blog.  Thank you Bob Nolan for sharing your awesome pictures.  Gary said that

"Those owls were there, apparently, because the lemming population in the north is unusually low, so they are foraging for whatever fish, rats or mice they can snag before continuing their winter flight to their southern habitat.   Let's hope they get enough to sustain themselves for the journey."

Late January

Ahhg... time flies when you are having fun!  I thought about the blog a lot over the past couple of weeks, but have had no chance to get it.  First a new flu bug got hold of me and that was no fun.  Soon after year-end  was a must.  But now things are moving along nicely and I have a bit more time for blogging.  I picked up some interesting stories and photos from friends over the last couple of weeks.  In the next bit, I will share them with you.  I hope you like them.  Margriet

Monday, January 2, 2012

Mason Bee home Kit- no nails- no glue!

Over the holidays, we have been busy assembling our new Mason Bee Home Kit.  It is a nifty product and will be a very popular item for children in schools and in the home.  Besides the pieces that make up the home, there is enough paper in the kit for making 20 nesting tubes.  This will get the child started.  If they decide to make more nesting tubes, newspaper or Kraft paper can be used to make more nesting tubes.  It will be fun to see how children will decorate their mason bee homes.  Please send in your photos of completed homes that are decorated and ready for the garden.   I am looking forward to seeing the art. 

Click on the link below to see the Kit.  Scroll to the last item in the Category


view the kit

Saturday, December 31, 2011

Oliebollen for the old and New Year.


Here are the Oliebollen.  Very good indeed!

Wishing you all the best for the coming year!

Bringing in the New Year with Oliebollen

My Dutch neighbour Alie told me that she is going to make oliebollen. This is a Dutch tradition that I remember from my childhood.  It is a memorable way to say goodbye to the old and bring in the New Year.  Every year Alie invites me for a tasty treat of oliebollen, but I have never made them.  I am off to give her a hand and maybe taste a few morsels....