Total Pageviews

Search This Blog

Saturday, April 30, 2011

Petri Dish storage system for mason bee cocoons

Cleaned cocoons stored in a petri dsih.
The best storage system that I have found for mason bee cocoons are petri dishes. They are 6"" in diameter and are transparent. In the fall, after cleaning cocoons, it is not always possible to set cocoons outside adjacent to the nest.  Many cocoons can easily be stored in petri dishes.

CANDLING-After washing and drying cocoons in the fall, about 150 cocoons are placed into each petri dish.  Cocoons are now ready for candling.  The lid is removed and candling is completed by rotating and tilting dish over light.  This movement allows the light to scatter in various ways and parasitic wasps are more likely to be seen and removed.

A petri dish lid protects bees,
and at the same time allows air movement
between inside and outside of the petri dish.


Apple bloom in Langley April 25th

This is an early blooming apple variety.  Most other apple varieties are still in the tight-bud stage.  Note dandelion bloom in background.  When orchard bloom is behind, and food resources are scarce for bees, dandelion bloom provides bees with ample pollen and nectar.

Crab apple pollinizer in full bloom
Apple blossom at the pop-corn stage.
These apple blossoms will be out soon!


Sunday, April 24, 2011

Keremeo's First Apricot blossoms

Hi!
Today (April 13th) I decided to send you a photo titled "First Blossom". It is a photo of our apricot blossoms in the popcorn stage with one blossom opening.  This year has been a cooler spring so our apricot blossoms are 2 to 3 weeks later than previous years, which hopefully is a good thing.  For the past 2 years our blossoms opened early & froze from the spring frosts so we have had a smaller crop of apricots.  This year we wish for a mild spring, good pollination & a  bountiful harvest.

We have scheduled to attend 10 Ambleside Farmer's markets starting on May 22 & 5 Kitsilano Farmer's markets starting on June 26. ( Ambercott Acres sells a host of organic products:  apples,  garlic, a variety of dried  products (sun dried apricots, mixed dried fruit, dried apples, sun dried plums,  vegetable medley, sun dried tomatoes, mixed fruit rolls, cinnamon apple carrot crumble, herbal tea blend, autumn spice, bay leaves),  & a variety of jams (apricot,  ginger pear, crab apple jelly, mulberry) spiced crab apples, walnuts and apricot kernels.

Here's wishing you well.
Smiles
Kaaaly

Story- Mason Bees make useful garden pets

http://www.vancouversun.com/life/Mason+bees+make+useful+garden+pets/4662774/story.html

Saturday, April 23, 2011

Viewing nest- observation nest

This is the 3-hole Beediverse Observation Nest.
Leafcutter bees are present in the left hand nesting tunnel.  The
remaining two nesting tunnels  are occupied by mason bees.
A thin film of acetate sits on top of the tunnel and below the lid.
"Spring is herei was walking around checking the honey beez and checked the masonic beez to see how they were doing.  i was wondering what i did with my small observation hive......couldn't remember at first, then there it was, about eye level right in front of me.  Duuuuuu.  i had done nothing with it last year.  forgot about it entirely......" Cal M.

Bee droppings

Matt B. writes.

"We're seeing a curious phenomenon this year, and hope you can enlighten us.  As we've done previous years, we set our cocoons out in plastic tubs with little holes cut in to let the bees emerge.  This year the bees (or perhaps some other creatures we haven't seen) seem to be leaving splats of mud on the outside of the release tubs, concentrated around the holes.  I've attached a photo of one of the tubs.  You can see they've dropped some mud on the plywood on their approach to the tub as well.  We're seeing male bees flying, but haven't seen any female bees or any activity around the nesting tunnels.  Have you seen this before?  Are the bees doing it?  Do you know why?"  
 These 'splats' of mud are the 'post emergence fecal droppings' or simply put 'bee poop'.  It  is a good sign to tell us that bees have emerged.   Now that warmer spring temperatures have arrived on the West coast of North America female mason bees will soon be emerging, mating and pollinating.  Thanks for the photo and your questions!  Margriet


Thursday, April 21, 2011

Beautiful Peach tree blossoms

Here are some of my peach tree blossoms.  Many pollen producing anthers surround the female stigma.  Once pollen has been transferred to the stigma, pollination has occurred.  This follows with fertilization,  fruit and seed development.  Unfortunately, cold temperatures have prevented any bee visits to these flowers.  It is just too cold.  However, the weather man says that the unusually cold temperatures in April will change to more normal and warmer temperatures.  I hope so!  My peach flowers cannot last too much longer.  Unfortunately flowers have a shelf-life- pollinated or not.   Three more days until warmer temperatures.  I will set out some more mason bees tomorrow.  I hope the weather co-operates.....


I am hoping these buds will develop into flowers just when the weather brings warmer temperatures for bee flight.


Tuesday, April 19, 2011

Petal Snow!

My early yellow plum is loosing its petals.  I call it petal snow.  Because of the very cold weather, I doubt that we will get any yellow plums this year.

Monday, April 18, 2011

Timing of bees emergence with bloom

This morning Ron W. emailed me some great questions. 


I am a bit confused on the subject of timing my bees emergence with my fruit tree blossoms.
Yes, the ultimate goal is for bees to emerge with fruit tree blossoms.  This is the easiest if the weather continues to be warm as we head into spring.  If periods of cold or rainy weather occur during spring, life expectancy of the bees can be short lived and pollination can grind to a halt.  

My trees are just beginning to flower, but it still cold outside. Is it too early to force them to emerge by warming the cocoons indoors? 
If the weather stays cold and rainy it is definitely too early to warm them up.  The problem with warming them up is that the emerged bees need food in the next few days.  If they cannot forage for food, the bees may starve. 

I understand that 75 deg F will allow them to emerge within about 4 days. But, do I want to put them outside after emergence with temps still in the upper 30s at night, and upper 50s during the day?  Yes, this is the problem.  Once they have emerged, bees have to be set outside no matter what the weather is up to.  Their longevity in cold temperatures and without food depends on their stored fat bodies- from the previous year's development.

 What do I use to let them emerge in, while indoors? I see you sell emergence shelters. As they are emerging, can the first to emerge just stay in the shelter (or box?) while I wait for the rest to emerge, or do they need to be released immediately as they emerge?  I usually set the emergence shelter with cocoons inside my home at 65- 70C for a day prior to setting them out.  The emerged bees, will be inside the emergence shelter until released the next morning.   Of course I take the risk that if it rains ( or is very cold) for a week, I will loose the emerged bees.   I find the emergence shelter the most useful emergence tool because it is bee- tight.  I usually set out 1/4 of my cocoons out at the time, with  5-7 day gap between emergence.  This way, some batches may be lost due to the weather, but unlikely that all four batches will be lost due to bad weather.
 
As an alternative to trying to out-fox the weather set cocoons out in a predator proof container late winter, and let nature do its thing.  

This latter method is definitely the one that I would recommend if you have less than 30 cocoons.
Margriet  

Wednesday, April 13, 2011

Starter Cottages used as release boxes in yurts.

Starter Cottages, available from my on-line Beediverse.com web site, are by far the best little box for use as a release box/emergence box.  I have tried all kinds of boxes, made from cardboard, plastic and wood.  Cardboard is too fragile and predators can get at the cocoons too easily.  Plastic sometimes overheats and is slippery for the bees to walk on while exiting.  Starter cottages are bee proof, can be washed for next year, and are relatively predator proof.  I usually place 100-200 cocoons per cottage.  One day before setting the cottage out into the field and adjacent to nests, I set the cottage out in the kitchen table. It gives the bees a head start on emergence.  I don't want bees to fly around my kitchen, so I need a bee proof container= Starter Cottage.


I used this plastic container to carry 5 Starter cottages to the field site.   Each has about 100 cocoons.  The door to the cottage is secured with a pin, sometimes two.  The entrance hole is temporarily plugged with a cardboard straw until the starter cottages are set up in the yurt or other structure.  These Cottages have been out of the fridge and into a kitchen environment for 24 hours.  This means that some of the males will have emerged.


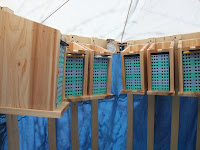
The D27 Yurt is set up with 9 Highrises in the upper part of the yurt.  Each Highrise has Eco-Corn Quicklock nesting trays with 72 nesting holes.  Note these Highrises do not have a cedar roof.


Starter cottages are set on top of each Highrise.
This is a Charly- Yurt containing many different
nesting trays, wood, plastic and eco-corn.


Once Starter cottages have been set in place,
the cardboard tube is removed.
Three males have emerged and are examining their new abode.   Note their long antennae- nearly as
long as their wings.
They now have to wait for the girls to appear.

Crab-apple blossoms in Langley orchard April 12 2011


Crab apple blossoms in bloom.    The yellow anthers hold the pollen in readiness for insect to collect.  Insects move  the pollen amongst the flowers.  The transfer of pollen from one flower to another is called pollination.

Crab apple blossoms are the first to appear in this orchard.  You can see that apple trees in the background are not in blossom just yet.  A honey bee is on the move amongst these blossoms (out of focus though).  Yellow pollen from these flowers was visible on the legs of this honey bee.

Tuesday, April 12, 2011

Plum blossoms, Vancouver 10th April 2011

 This 20 year old yellow plum has the most profuse blossoms.  Unfortunately, when it is in bloom, like this year, temperatures are cold and it often rains.  Lack of pollinators when it is cold results in plums only every 4-5 years.  The blossoms are spectacular though.   After about 1-2 weeks of blossom the ground is covered in a carpet of pink petals.  A lovely sight.  Every year the tree grows some more. I will have to get it trimmed sometime soon...
T

Wednesday, April 6, 2011

Problem: mason bees going into old tubes


" Hi & thank you for your response to my prior eMail of several weeks back.   Now I have another question.   First I have some good news.   It seems most of my  bees had not hatched from their tubes before the cold & stormy weather hit us.   Today there are lots of bees near the tubes & in my garden too!   There is a lot more debris below the tubes which means many bees from deeper in the tubes    have made their way out - mostly females to boot!
Now the question:  The bees are going back inside the "used tubes".   Will they re-use the old cardboard tubes or is there another reason they continue to enter last year's tubes?   Should I remove the tubes?    I have 2 of your houses with the colored Eco-Quicklock blocks.   I've added paper liners to about 20% of the holes & will see if the bees have a preference for the lined holes.   Bees are beginning to use the houses but it's too early to tell if there is a preference. 
 Thanks for your attention."


Hi Tony,
You have come up against one of the most difficult things to do in mason bee keeping i.e. get the bees to use new nesting-tunnels while the old ones are still present.  For the most part, it is not possible to exclude their use of old nesting tunnels.  Because mason bees re-use nesting tubes, that may be deceased, it is better to remove cocoons from nesting tubes in the fall- then the bees do not have a choice.  As soon as bees re-enter the old tubes, they are laying eggs.  In other words, if you remove them now, you would be destroying the new bees.  I would keep everything like you have it and in the fall- open all tubes, and harvest the cocoons.  Good luck.  Margriet


"Hi,   Thank you for your response.   This coming fall I'll do as you suggest & harvest the cocoons.  Tony L."


Monday, April 4, 2011

Scavenger beetles and mites

"Hi Margriet,

I called you yesterday from the 16th/Oak community garden about a strange pest we found in our mason bee hive. They looked like larva with little red heads and were crawling over the cocoons in one of the trays. Do you have any idea what they might be from the attached images?

By the way I've read your book cover and cover and if I may be so bold I'd like to offer a small suggestion. Being a novice mason bee keeper I found it really hard to imagine and identify the pests you were talking about with the black and white drawings. Perhaps in future additions if budgets permit you could include actual photographs of the critters you describe? I'm sure the community at large would offer many for your book :) In all other respects that book was invaluable! 

I've also recently heard of people not using the bleach/water solution to clean cocoons but to use sand instead as an abrasive to remove mites. Have you or others ever tried the technique? 

Many Thanks,
Maria"

Hi Maria, 
Thank you for your pictures and comments.  
 Scavenger type beetle larvae.  Note size in comparison with 
mason bee cocoon in upper right hand side of picture.

Cscavenger type  Beetle larvae are reddish brown and can be recognized by their long bristles on each larval segment.

  • This pest is a carpet beetle (Page 90 Pollination with Mason Bees by M.D Dogterom.  These beetles feed on pollen provisions and nest debris.   
  • Yes, a book in colour would be awesome.  Like you mentioned, budget permitting.  It is definitely in the works for a future edition.
  • Yes, I have heard about the sand/abrasive technique to remove mites.  I have not used it myself.  I use a metal mesh as an abrasive surface to remove mites, and do a final rinse in bleach to remove any molds and parasitic fungi.  Using an abrasive surface like a metal screen works very well.  The sand is also used as an abrasive technique to scour mites from the cocoons.  I prefer not to deal with sand and find this a definite advantage.
Margriet

Sunday, April 3, 2011

A story about keeping Mason bees- by Pat Mc.

"Just wanted to drop a line to say how much my wife and I have enjoyed having mason bees these past 10 years (or more), I really can't remember how long ago we got them. We received them from Dr. Margriet Dogterom at an information session she held in Maple Ridge. We started with the drilled blocks and then began rolling our own tubes from newspaper. This was how we assisted our "girls" until three years ago when we discovered the cardboard tubes. These worked much better, however the squirrels found the tubes delicious and easy to remove from our blocks. I fouled their nefarious plans two years ago when I placed our blocks in an old outdoor fireplace I had. I just cleaned it out and put the blocks inside it and closed the metal mesh door. The metal "bee palace" was then placed in a prominent sunny location and everything seemed to work great.
Our two blueberry bushes are always packed solid, and the pear tree is also often overburdened with fruit.
We were very excited to purchase our new "Bee House" this year and when we found out the design was courtesy of Dr. Dogterom we were certain we had found the ideal product. We raced home with it, looking forward to putting the girls into their new digs.
Much to our disappointment we just discovered when we got home that tragically our tubes that were removed from the blocks got wet last night in the downpour. The wind must have blown the rain into the container. I fear most of the brood are probably dead. I salvaged 4 tubes that were completely untouched and dry, then went to the nursery and bought two more tubes.
I'm certain with the new corn/plastic blocks and the ability to readily remove the cocoons with little risk of damage, next year we will be back up to a large colony. The new blocks will also mean I can keep things much cleaner, so the girls will be healthier.
Saw a big bumblebee yesterday. They always make me smile."

Setting up the D27Yurt in late March- Vancouver BC-Part II

The farmer asked us if we could place additional mason bees into his orchard besides the ones going into  Charlie's yurt located at the front of the orchard.  We chose a spot in the middle of his orchard, away from Charlie's yurt.  The orchard is located in the Fraser valley, BC.


  • Our very first job in the orchard was to dig a hole for a post.  Here is Tim digging a hole with a post-hole digger.  The yurt will be tied to this post, so it does not topple over in a strong wind.


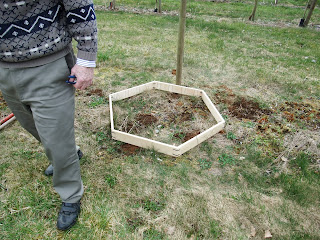
  •  All parts of the yurt were hauled to the site in a wheelbarrow.  The wheelbarrow contains uprights and tarp that goes around the yurt.  On the ground you can see the roof hexagon and the ground hexagon.  The white roof tarp is on top of both hexagons.


We assembled the roof by inserting 6 metal rods into the hexagon and the roof center piece. The six metal rods keep the roof tarp at a nice slope to keep the rain from pooling on the tarp.  The roof-tarp is then stapled onto the center piece, and then onto the roof-hexagon.


  • The ground-hexagon was set down in place adjacent to the post.


  •  Using screws and a drill, 3 uprights were attached to the ground-hexagon.  A drill and a bag of screws are in the foreground.


  • The fully assembled roof was screwed into position at the top of the three uprights.


  • The yurt was completed by attaching remaining uprights and stapling the tarp surrounds under the roof tarp.  Finally a rope was used to tie down yurt to the post.
Now that this yurt is in place, the next thing is to hang Highrises in place, and set out mason bee cocoons.

Apple flowers are in bud while Pieris and Heather flowers are in full bloom.

In a small orchard in Langley, Apple blossoms are swollen but not in bloom quite yet.  I took this picture in the last week of March.


Although early spring flowers are not abundant, there are many hidden patches of flowers amongst buildings and in gardens. These flowers are important food sources for early bumble bees.

Last week I was lucky enough to get a  few sightings of bumble bees.  All sightings have been in amongst Pieris blossoms. Their flight and movements were fast.

Beautiful cherry blossoms in Blaine WA.   31 March 2011
Same cherry blossoms.  Note the Pieris bush behind
 the tree on the right.  Some of the Pieris blossoms
 are visible on the right hand side of the photo.


Blossoming Pieris above a pond in a Japanese garden.
Vancouver BC 30 March 2011
Heather patch in a Japanese garden
Vancouver BC, 30 March 2011

Saturday, April 2, 2011

Setting up the D27Yurt in late March- Vancouver BC

This week I have been busy setting up yurts to house my mason bee cocoons. This is critical in areas where spring weather may be cool and wet. The inside of a yurt environment provides mason bees with warmer temperatures than outside temperatures. These warmer temperatures are more suitable for developing bees and growing bees successfully. For this reason, yurts or similar type structures are the way of the future for mason bees.

Our newest yurt, model D27 or D27Yurt is compact (3ft in diameter) sturdy, can hold 27 highrises and is easy to assemble. Each yurt can be put together in 2-3 hours with a screwdriver, drill and a pair of pliers. Three D27Yurts will be set out in different locations to test their effectiveness.

I am excited to have all cocoons set into yurts this year. I will be setting up a total of 5 yurts. Each yurt has the capacity of holding 648 nesting tunnels at each of 3 levels. a capacity of 1944 nesting holes.  At each of 3 levels, there is space for 9 Highrises (72 nesting tunnels per Highrise). Of course temperatures will be higher at the top levels compared to the lower levels, but more about differing temperatures inside the yurt in later blogs. Two yurts in use were designed and made by Charlie F. The remaining yurts will be the new D27Yurt.


This is Charlie's yurt.  The tarp is 3 years old and is still in good shape.  We checked for holes in the tarp and found a few where the wood rubs the tarp.  We taped some duct tape over the few holes we found.  It is ready for hanging Highrises and setting out cocoons.


I have even set up a D27Yurt on the deck of my home. Previously I had 3 boxes (2 x 2 x1.5ft) attached onto the wall of my home. In each box I used to set out an assortment of nesting trays and houses. This site is less attractive now because my peach tree shades that part of the house. The deck receives more direct sun than any other part of my garden- so it should be a good site for my bees. Yesterday, the Highrises were hung into a D27Yurt at the home site. The sun came out for a brief period and temperatures rose to 80F inside the yurt! It is nearly time to set out the cocoons. The Peach tree is beginning to fill out their buds.